Instrument Cluster - Removal

Introduction | Removal Procedure | Related Information | Autocheck Info  | MIL Circuit

 Tools Required :

Cross-headed screwdriver

Long flat-headed 'terminal' screwdriver (for gently prising connector clamps off)

Time Required :

About 10 minutes

WARNING !

It is not absolutely necessary to disconnect the battery before doing this job as all the relevant connectors have female plugs, but it is better to be safe than sorry with all electrical tasks and the negative lead at the battery should be disconnected if you are in any doubt about proceeding further.

NOTE - This task will reset the vehicle's LCD clock and Autocheck system. The latter will forget any accumulated mileage and fuel information.

Description :

  1. Remove the two cross-headed screws securing the upper and lower steering column cover. These are easily accessible on the underside of the steering column while sitting in the driver seat.

  2. Remove the upper steering column cover.

  3. Remove the two cross-headed screws which secure the instrument cluster to the dashboard. Don't fret if these screws drop into the lower steering column cover as they can be easily retrieved by tilting the cover away from the dashboard a little.

  4. Gently tease out the right hand side of the instrument cluster at an angle with sufficient clearance to access the electrical connectors at the rear of the cluster.

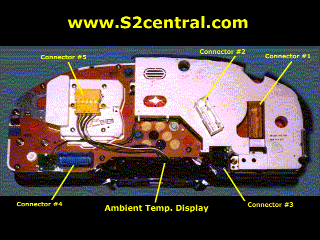
  5. Using the terminal screwdriver (or strong finger nails) gently lever up the purple coloured clamp which secures the blue multi-pin connector (#4 ) before unplugging the connector from the cluster.

  6. Still working at the right side of the cluster, gently lever the two location legs outwards for the yellow coloured multi-pin connector (#5 ). This connector is only present on vehicles with the ambient temperature display unit. This is the trickiest connector to remove so be patient - the rest are easy :) 

  7. Gently ease the instrument cluster back towards its normal position before teasing it out on the left side - again at an angle with sufficient clearance to access connector blocks.

  8. Remove the yellow coloured multi-pin plug ( #1 ) after the purple clamp is first levered out gently.

  9. Repeat step 9 for the white coloured multi-pin plug ( #2 ).

  10. Squeeze the two locating legs to facilitate removal of the small black coloured multi-pin plug ( #3 ).

  11. Now that all electrical connections are removed the instrument cluster can be CAREFULLY removed by rotating it onto its back and sliding it out towards the centre of the car. Take care not to scratch the cluster or stalk controls on the way out.

Click Here For Detailed Figure

In the immortal words of Mr. Haynes - "Refitting is the reversal of removal."

Last Updated 15th October 2002