|
The Autocheck Computer
Introduction
| Functionality
| Hidden Features
| Country Coding
| Fuel/Range Calibration
|
|
Fuel
& Range Calibration
Please be patient while lots of images load
into this page...
In order to calibrate the fuel/range parameter on the Autocheck system,
it is necessary to have a full tank of fuel and that the car is parked
on level ground. The procedure is a simple adjustment of a potentiometer
on the rear of the instrument cluster in order to finely adjust how many
litres of fuel the computer thinks are in the full tank. In doing this,
it is possible to calibrate the system to the actual amount of fuel in
the tank or to include an amount of margin for error - if you are the sort
to ignore low fuel warnings for as long as possible and need a certain amount
of 'reserve' fuel.
The 80/90 Coupe has a fuel capacity
of 70 litres whereas the Avant has 64 litres. Unsure of Sedan fuel
capacity but I suspect it is same as Avant -
can anyone confirm or deny that
?
|
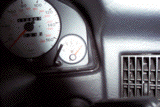
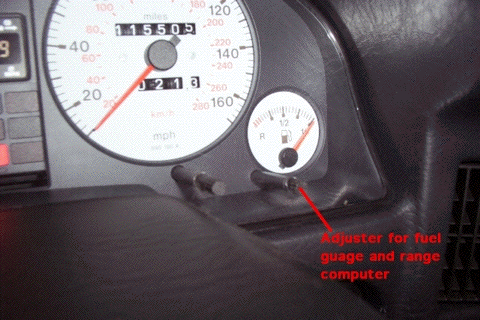
The mechanism to adjust
the fuel range potentiometer is via the plastic adjustment knob near
the fuel guage on the front of the cluster.
This knob is also designed to adjust
the position of the fuel guage needle, but I discovered that this linked
mechanism is less than ideal.
Unfortunately the cap
on the adjustment screw is incredibly hard to remove as there is insufficient
clearance to lever it away or tug it with pliers. Sometimes it seems
like nothing is straightforward on the Audi S2 !
|
|
So before describing what should
be a trivially simple task, lets first consider how to gain access to
the adjustment screw. If your luck is like mine, you will discover that
after uncovering the adjustment knob it only adjusts the fuel guage and
does not quite engage with the trim potentiometer for the Autocheck system.
If you have no such problems then proceed directly to
Part 3
- lucky you !
|
Part 1 - Remove the stubborn cap from the fuel adjust knob
Tried as I did with various
tools, I could not prise off this frustrating end cap. Not wishing
to damage the cluster, I had to resort to removing
it as described here
. Once it was on the bench it was easy enough to disassemble the
cluster, but I wouldn't recommend it to those of a ham-fisted nature
as there a dozen or so small screws and a number of connectors which need
to be carefully manipulated along the way.
|
Step
|
Description
|
Image
|
|
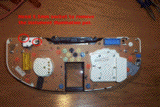
01
|
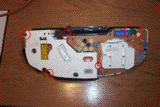
With the cluster removed
from the car, resting upside-down on the bench, the first thing to
do is remove the four screws that secure the Autocheck module to the
cluster. Screw locations are shown in the photo along with the location
for the fuel/range adjustment pot.
|
|
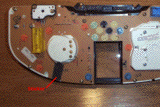
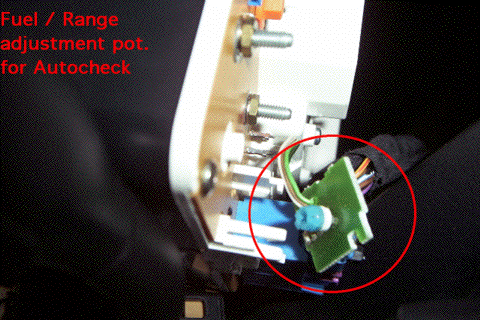
| 02 |
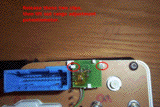
Next, gently prise
out the fuel range adjustment pot which is attached to the Autocheck module
on a three-wire harness. Refer to the photo for tips on removing this part.
|
|
03
|
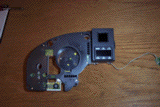
Gently separate the
Autocheck module from the cluster's main circuit board. Leave this
to one side in a safe place !
|
|
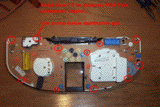
| 04 |
Remove the illumination
dimmer pot from the PCB. This is secured by two 5.5mm nuts with washers.
Refer to the photo for details.
|
|
05
|
Now it is almost time
to remove the screws which secure the PCB to the cluster shell. Before
that, you may need to carefully slice a bar-code sticker which is slapped
to both items.
|
|
| 06 |
Using a Torx #10 driver,
remove the eleven screws which hold the PCB onto the cluster. Watch
out for the washer used on the screw thru the heatsink of the voltage
regulator. Screw locations are notated in the photo.
|
|
07
|
Tease apart the PCB
from the cluster being careful not to bend the circuit board. As you
do this, the fuel guage adjuster knob may or not come out with the PCB.
The illumination dimmer will stay with the cluster housing, but the other
two adjusters (clock and odometer) will come out attached to the circuit
board.
|
|
08
|
It is now possible
to get a decent grip on the fuel adjust knob so that the ill-designed covering
cap can be removed. Simple huh ?
|
|
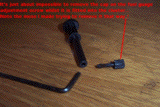
09
|
In order to avoid doing
this in the future, you may wish to throw the cap away, but I found
that just partially inserting it back into the adjuster (as shown) was
enough to keep it in place but also provides enough clearance so that
it can be easily pulled out from the front of the cluster.
|
|
10
|
Refitting is a reversal
of removal, but be careful to properly engage the fuel adjust mechanism
with the geared cog on the fuel guage. This is the fiddliest part. Check
if the adjuster operates only on the guage or if it has sufficent grip
on the Autocheck pot to turn that also. If it only moves the guage needle,
then you may wish to leave the Autoccheck pot unclipped from the rear
of the cluster until the calibration sequence is complete.
|
|
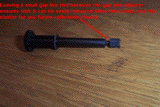
Now that you have successfully separated the adjuster end-cap
and rebuilt the instrument cluster, a 3mm allen key can be used to adjust
the fuel guage AND the fuel/range pot for the Autocheck
system at the same time.
Try this on the bench to check that this does indeed move the
fuel guage and that it also correctly engages with the Autocheck pot.
If it does then proceed to Part 3
. If not, then goto Part 2
for a simple workaround. You may also find that, with both
these adjustments being made in unison, it is not possible to get the
Autocheck calibration correct and still have an acceptable bias on the
fuel guage - in which case have a look at Part 2
to allow the calibrations to be done independently.
|
Part 2 - What to do if the adjustment knob does not engage
properly
This is the case on my car and I
doubt that it is unique in this regard.
The solution is simple but fiddly...
With the instrument
cluster connected up to all the car's wiring, unclip the fuel/range
adjustment pot from its location on the back of the cluster.
This is going to be tricky if you haven't removed the cluster before
in order to see how the adjustment pot is clipped into the housing so
it might be wise to do a little investigation before-hand...
With the fuel/range pot separated from the guage adjuster, the
pot can be adjusted by hand without altering the position of the fuel
guage. Refer back to Part 2
if necessary.
|
|
Now proceed to
Part 3
for the actual calibration sequence !
|
Part 3 - Finally... The actual calibration sequence !
OK so you are now in a position
to check or adjust the calibration for fuel/range calculations on the
Autocheck system - either with the 3mm allen key into the guage adjuster
knob OR by direct adjustment of the fuel/range pot. The following is
performed with the instrument cluster fully connected to the car.
For
best accuracy, the following must be performed with a completely full
tank of fuel and with the car parked on a level surface.
|
Step
|
Description
|
Image
|
|
1
|
With the ignition key in
the OFF position, press and hold down the Autocheck RESET button.
|
N/A
|
|
2
|
Keeping the RESET button
pressed, turn the ignition key to the ON position. Verify that
the correct Autocheck computer code is displayed (a532 for the
S2).
|
|
|
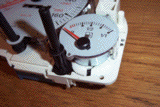
3
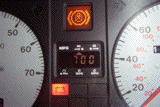
|
Release the RESET button
and verify that the next number displayed is approximately
the amount of fuel in the tank. This is displayed in litres x 10.
With a full tank of fuel this should correspond to 70 or 64 litres for
the S2 Coupe or Avant respectively. On my car it read 649 before I adjusted
it and you can see that the guage is not quite showing 100% full.
|
|
4
|
You may wish to adjust
the fuel reading such that it is calibrated for the actual amount of
fuel in the full tank, or by leaving say a gallon (five litres) in reserve.
Adjust the fuel/range pot such that the number shown in the Autocheck
display is 700 or 640 for the Coupe or Avant, or reduce that figure in
steps of 10 for each litre of reserve fuel capacity you wish the computer
not to know about. The factory manual actually recommends that the adjustment
be set for 65 litres of fuel in the Coupe. I calibrated my system to the
full 70 litre capacity.
|
|
|
5
|
Verify that the fuel guage
reads at an acceptable 'full' position or adjust it as necessary with
the 3mm key. For this reason it is perhaps best to calibrate the fuel
guage separately from the Autocheck system.
|
|
|
Part 4 - Fuel consumption correction factor
|
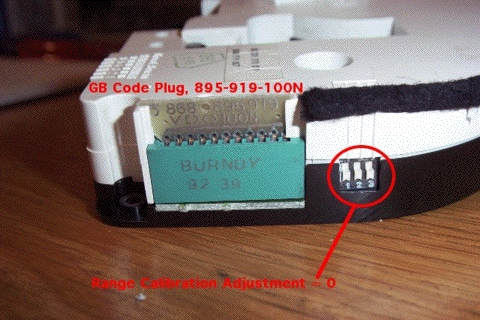
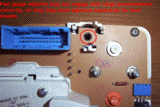
In the factory, the
Autocheck / Trip computer is set to 0% correction with the dipswitches
shown here alongside the country code plug.
It is possible to alter the position of these switches to provide
a 5, 10 or 15 percentage skew on the fuel & range calculations.
The only reason I can imagine this is necessary would be if the car
is fitted with significantly larger or smaller sized wheels/tyres eg Winter
Tyres.
|
|
For reference purposes, here is a quick summary of all the valid combinations
for setting the fuel consumption correction factor.
|
1
(10)
|
2
(5)
|
3
(+/-)
|
Setting
|
|
OFF
|
OFF
|
OFF
|
0%
|
|
OFF
|
OFF
|
ON
|
|
|
OFF
|
ON
|
OFF
|
+5%
|
|
OFF
|
ON
|
ON
|
-5%
|
|
ON
|
OFF
|
OFF
|
+10%
|
|
ON
|
OFF
|
ON
|
-10%
|
|
ON
|
ON
|
OFF
|
+15%
|
|
ON
|
ON
|
ON
|
-15%
|
|
;)
;)
;)
;)
;)
;)
;)
;)
;)
;)
;)
;)
;)
;)
;)