Centre Console - Removal & RefittingThis section provides a simple 'How To' for the least mechanically minded S2 owner needing to remove the centre console. This task is required when bulb replacement on any of the following is required: Ash Tray The following tools are required : 1\4" drive set with 8mm socket, 13mm socket, a star-headed screwdriver and a regular pair of general purpose pliers. |
|
Summary The correct way to remove
the centre console is to first understand that it is comprised of two sections
- Front and Rear. Pay attention to which fixings come from which locations.
There is no need to remove the radio or the heating/aircon control unit.
The Rear section needs to be removed first as follows.
Removing the Rear Section: 1. Secure the handbrake lever firmly in the ON position to provide sufficient clearance. 2. Remove the small trim panel beside the cigarette lighter as pictured below. A finger nail is enough to tease it out from the top. 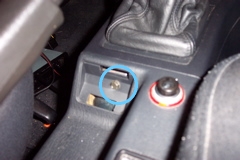
3. Remove the 8mm headed screw that is exposed by the little trim panel. This joins the front and rear console sections. 4. Remove the rear ashtray from the centre section and the 13mm headed nut that is exposed. 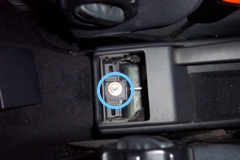
5. CAREFULLY pivot the rearmost section of the console up and over the handbrake lever, noting that it is quite a tight fit getting past the lumbar controls in the front seats and that the wiring for the rear diff switch and cigarette lighter need to be gently removed to fully release the rear section of the console. Removing the Front Section: 1. With pliers and a piece of protective cardboard folded into the jaws, remove the heater control knobs and the front panel of the heater controller. 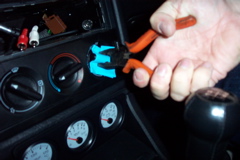
2. Remove the two screws securing the heater control panel - identified below. 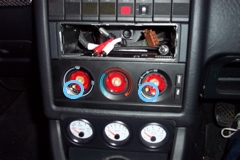
3. Remove the two cross-headed screws exposed by the previous step and the piece of trim that is secured above the auxiliary guages. 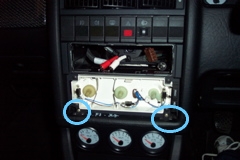
4. Loosen the front lugs on each side of the lowermost point of the centre console where it meets the carpet as shown. These slide downwards to remove the lugs from behind the trim. The screwdriver shown below marks the approximate location on the drivers side (UK). Do NOT prise these lugs or they may break. 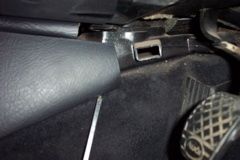
5. Unscrew the gearknob. 6. Slide front section of the console towards the rear of the car, lifting it clear of the gearstick and removing the electrical connector for the auxiliary guages to complete the task. Removal is the reversal of refitting. Make sure the front section lugs are properly engaged before attempting to refit the auxiliary guage trim or attaching the rear centre section of trim. |